
In Networked Sensor For Development class, Our group's challenge is RUN IT OFF BATTERY --"It should run off of a rechargeable battery. Charged only once for at least 2 weeks."
After discussing about the topic we are more interested in, we discovered that there are many developing countries are suffering from the bad air quality and environment pollution. Most of this kind of health threatening are lurking in people's daily life. Obsolete cooking equipment and burning coal in door to keep warm are main sources of pollution in their home. People are usually unaware of the danger because they do not know how bad it is. So our group decided to make a low energy indoor air pollution tester to help these people detect the air pollution in their home and arouse their attention to this health threats.
After research, we discover that cooking and heating is the most common indoor combustion behavior. Air pollutants from a gas stove , electric stove, heaters, fireplaces and other equipment burning wood, coal , oil , gas and other produce mainly pollutants like carbon monoxide, nitric oxide and nitrogen dioxide.
Therefore we decided use MQ-7 carbon monoxide sensor and dust sensor to detect the air pollution. The low energy strategy for our project is using a solar panel as energy resource, plus we also use an homemade low energy Arduino instead Arduino UNO to save more electricity.
Building Time
We build each part separately , first, we build a breadboard Arduino at first, then we use Arduino UNO to test if dust sensor and gas sensor works well. And Finally, we put this three parts together.
For the breadboard Arduino, we used
- Breadboard
- ATmega328p
- An Arduino Board
- A LED
- 10k resistor (optional)
- 0.1uF capacitor
- USB-Serial adapter (FTDI)
- Jumper wire
- Wire strippers/snippers


Dust sensor part
We used
- Arduino
- Sharp Optical Dust Sensor – Datasheet
- 6-pin TE 1.5mm pitch connector cable
- 220 uF Capacitor
- 150 Ω Resistor
- Breadboard
- M/M jumper cables

Pins Assignments
Sharp Dust Sensor Attached To
1 (V-LED) 3.3V Pin (150 Ohm in between)
2 (LED-GND) GND Pin
3 (LED) Digital Pin 12
4 (S-GND) GND Pin
5 (Vo) Analog Pin A6
6 (Vcc) 3.3V Pin (Direct)
At first, we connect the sensor with 3.3V on Arduino UNO, but the data received is not accurate and inconsistent. then we found we cannot reach the maximum using the 3.3V input on the Arduino. Then we used a extra 9V battery and a regulator to input 5V to the Arduino. And we can receive more reliable data in this way
Gas Sensor Part
- 1x Arduino (I was using an Arduino Uno)
- 1x MQ-7 Carbon Monoxide Sensor
- 1x Breadboard
- Connecting wire
- 1x 10K Resistor
- 1x 220 Resistor
- Soldering Iron + Wire
- +5V Power supply


This part is a tricky part for us. After connect the circuit, the data cannot read consistently, and the data always jump. Then we found The MQ7 requires a heater voltage that cycles between 5v (60s) and 1.4v (90s), drawing approximately 150mA at 5v which exceeds the power capacity of the Uno.
So, we change the loop in our code like
void loop() {
// 60s high voltage 5.0v
Serial.println( "Heating Sensor" );
analogWrite(triggerPin, 255);
delay(60000);
// 90s low voltage 1.4v
analogWrite(triggerPin, 67);
val = analogRead( sensorPin );
for ( counter = 0; counter < 90; counter++ )
{
Serial.print("Sensor Value: ");
Serial.println(val);
delay(1000);
}
}

Unfortunately , The problem didn't solve by this code, We need more time to deal with this guy, we find a good tutorial to follow, and we hope we can get correct data in this way. Therefore, we assemble the dust sensor with homemade low energy board at first.
Assemble part:
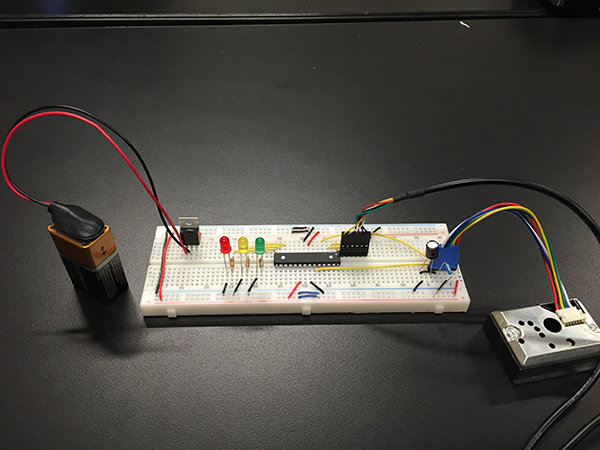
We assemble the dust sensor with homemade low energy board together, and used three LED to show the air quality. If air quality is good (data from 0-300) Green LED light up.If air quality is even (data from 300-600) Yellow LED light up. If air quality is bad (data more than 600) Red LED light up.


We also add Sleep model for their board. We added the JeeLib libraries in our code, and replaced the delay() function with the Sleepy function. We made an experiment, It showed it can save a lot of energy by changing delay() to sleepy function. If we use delay() function, the current is 0.03-0.02, occasionally 0.04 appeared. And if we changed to sleepy function, the current is only 0.02-0.01.


